Here is what I use. After a few tries I settled on this. Not the best or the worst, but it works for me. Anyone that has only done jars so far and wants to try bulk can start here. This will also be supported in nexus chat when I'm around. Sources for this info are varied, most was learned at the shroomery. Tupperware is put on he oven, make sure you test this and use common sense. I've done this dozens of times without an issue, but please be smart and careful here. Understand the plastic in your tupperware, its temperature rating, and your oven hot spots.
Hardware:
- Polyfill (available directly or also in pillows and very cheap)
- 54qt tupperware container with a weather seal (like this). Measure your oven to make sure it fits inside for pasteurization.
- Oven meat thermometer
- Personal HEPA filter unit (optional)
Ingredients:
- 5 fresh fully colonized quart grain jars
- 400g coir
- 680g black cow (composted cow manure). The one I use is 30% moisture so if starting with dry pellets use 476g and top off with 204g of water.
- 130g vermiculite
- 130g straw
- 2L of water
- 60 g gypsum (optional) - this can help with moisture mistakes
- Half teaspoon of calcium carbonate (optional) - this increases the pH to try to slow down the contaminants during the post pasteurization race
Procedure:
- If this is your first run, turn the tupperware into a "monotub" by drilling 10 small holes (~5/16 inch in diameter) 3 inches from the bottom and 6 larger holes (~1 inch in diameter) 3 inches from the top. Be slow and patient while you drill to avoid cracks. Stuff the holes with polyfill so that there is some resistance, but don't overstuff so there is good airflow. During the grow, mushroom CO2 will exit through the bottom holes (since it is heavier than N2 and O2) and fresh air will come in through the top holes. There is no need to open the lid during the grow.
- Boil the water
- Preheat the oven to lowest setting (<200F)
- Optional: out a large black plastic bag in the monotub (large enough to touch all the monotub walls). This helps with mixing the ingredients later and also minimizes mushroom growth against the walls which is difficult to harvest.
- Add the coir to the monotub
- Add the hot water to the monotubamd close the lid
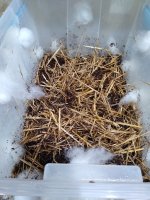
- After about 10 minutes add the rest of the dry ingredients and stir until uniform (see first picture). Leave your stirring utensils in the tub so they are pasteurized for subsequent steps. Correct moisture level will cause a couple drops to drip if the substrate is squeezed tightly (field capacity). Add more water if needed.
- Insert meat thermometer into the substrate and close the lid. Temperature will be around 120F
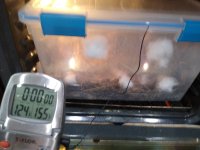
- Insert the monotub into the oven (second picture).
- Bake until meat thermometer reads 155F
- Remove from oven and place in a small room. Temperature reading may go up by a few degrees after leaving the oven, that is fine.
- (Optional) turn on the personal HEPA filter and close the door while the monotub cools. This will scrub the air in the small room. Avoid walking in and out of the room.
- Once the meat thermometer reads 95F or lower add the colonized jars to the tub and mix with the pasteurized utensils. Work quickly. Shaking the jars beforehand so you can pour the colonized grain easily, wearing a mask over the mouth so you don't breathe into the monotub, and clean plastic gloves are good ideas. Fresh clothes or post shower nudity make sense too.
- Close the monotub. No casing is used.
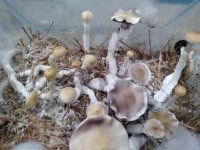
- Do not open the monotub until the mushrooms flush (up to 100 dry grams). This takes about two weeks or more. You should be able to see the airflow between the large and small holes as "tracks" where there are no moisture droplets.
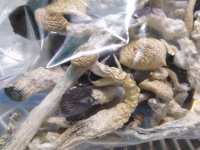
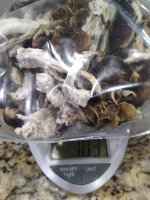
- Collect the first flush and close the tub, expect at least two more flushes. Adding more water does not seem to be necessary unless things look dry. If all goes well you should get close to 200g total of dry fruits.
That's it. Cheers.
4/17/2021: Edit - slightly reduced water ammount (from 2.6L to 2.35L). Added liner option.
10/16/2022: Edit - reduced water from 2.35L to 2L and mentioned that more water can be added while checking for field capacity when squeezing.
Hardware:
- Polyfill (available directly or also in pillows and very cheap)
- 54qt tupperware container with a weather seal (like this). Measure your oven to make sure it fits inside for pasteurization.
- Oven meat thermometer
- Personal HEPA filter unit (optional)
Ingredients:
- 5 fresh fully colonized quart grain jars
- 400g coir
- 680g black cow (composted cow manure). The one I use is 30% moisture so if starting with dry pellets use 476g and top off with 204g of water.
- 130g vermiculite
- 130g straw
- 2L of water
- 60 g gypsum (optional) - this can help with moisture mistakes
- Half teaspoon of calcium carbonate (optional) - this increases the pH to try to slow down the contaminants during the post pasteurization race
Procedure:
- If this is your first run, turn the tupperware into a "monotub" by drilling 10 small holes (~5/16 inch in diameter) 3 inches from the bottom and 6 larger holes (~1 inch in diameter) 3 inches from the top. Be slow and patient while you drill to avoid cracks. Stuff the holes with polyfill so that there is some resistance, but don't overstuff so there is good airflow. During the grow, mushroom CO2 will exit through the bottom holes (since it is heavier than N2 and O2) and fresh air will come in through the top holes. There is no need to open the lid during the grow.
- Boil the water
- Preheat the oven to lowest setting (<200F)
- Optional: out a large black plastic bag in the monotub (large enough to touch all the monotub walls). This helps with mixing the ingredients later and also minimizes mushroom growth against the walls which is difficult to harvest.
- Add the coir to the monotub
- Add the hot water to the monotubamd close the lid
- After about 10 minutes add the rest of the dry ingredients and stir until uniform (see first picture). Leave your stirring utensils in the tub so they are pasteurized for subsequent steps. Correct moisture level will cause a couple drops to drip if the substrate is squeezed tightly (field capacity). Add more water if needed.
- Insert meat thermometer into the substrate and close the lid. Temperature will be around 120F
- Insert the monotub into the oven (second picture).
- Bake until meat thermometer reads 155F
- Remove from oven and place in a small room. Temperature reading may go up by a few degrees after leaving the oven, that is fine.
- (Optional) turn on the personal HEPA filter and close the door while the monotub cools. This will scrub the air in the small room. Avoid walking in and out of the room.
- Once the meat thermometer reads 95F or lower add the colonized jars to the tub and mix with the pasteurized utensils. Work quickly. Shaking the jars beforehand so you can pour the colonized grain easily, wearing a mask over the mouth so you don't breathe into the monotub, and clean plastic gloves are good ideas. Fresh clothes or post shower nudity make sense too.
- Close the monotub. No casing is used.
- Do not open the monotub until the mushrooms flush (up to 100 dry grams). This takes about two weeks or more. You should be able to see the airflow between the large and small holes as "tracks" where there are no moisture droplets.
- Collect the first flush and close the tub, expect at least two more flushes. Adding more water does not seem to be necessary unless things look dry. If all goes well you should get close to 200g total of dry fruits.
That's it. Cheers.
4/17/2021: Edit - slightly reduced water ammount (from 2.6L to 2.35L). Added liner option.
10/16/2022: Edit - reduced water from 2.35L to 2L and mentioned that more water can be added while checking for field capacity when squeezing.
")