• Members of the previous forum can retrieve their temporary password here, (login and check your PM).

Setting Up and Dialing in a Greenhouse - Come along for the ride

Migrated topic.

Pup Tentacle

lettuce
I've recently decided that with the way I like to cultivate mushrooms and the techniques that work best for me, the time for a greenhouse has finally come.

I figured that I'd share the process of setting it up and dialing it in for posterity's sake. I hope it inspires or helps someone else.

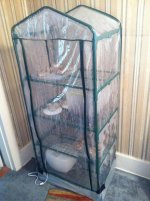
Also known as a "Martha", the greenhouse is simply a frame enclosed by clear plastic or vinyl sheeting that will hold in humidity but allow FAE. They can be bought at big box hardware stores and many other places for about $40 OR pretty easily made from parts for less.

I picked mine up at Lowes. $40... 5 minutes to assemble... pow.

To keep up the humidity, I have a Vicks Cool mist humidifier on the bottom shelf. This is the kind with an impeller doing the work. Most of what I've read mentions the impeller being superior to others because of the turbulence it causes which aids in FAE. The vinyl cover to the green house has had 1/4" holes punched into it with a paper punch about every 4 inches on the front, sides, and top. The back, which is up against a wall has no holes in it.

The bottom is just a pice of 4mil plastic sheeting folded up at the corners and duct taped… when I can find a plastic tub that fits the bottom of the GH I intend to use it instead.

So far the humidifier is running 24/7 and extra FAE happens when I open the whole thing up about 3 times a day. The plan is to have a fan running on it for 5 minutes every 4 hours , but currently my timer that will do that that's working is lost amid rubble from moving into our new house.

That's about as far as I've gotten. I plunked some cakes in there as well as smaller tub I'd been fruiting in other accommodations. After 5 days, I've got some decent pinning going on. I think it could have been better with more FAE, but we'll get there…

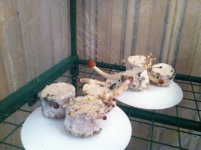
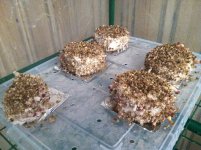
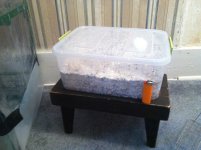
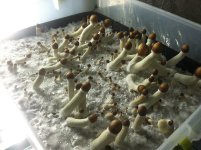
A couple pics. One of the whole greenhouse and a couple of the cakes. One batch is half pints that have been dunked and rolled the others are quarter pints that have NOT been dunked or rolled.

I'll update this as it all progresses...
 

Attachments

  • greenhouse.jpg
    greenhouse.jpg
    179.5 KB · Views: 0
  • small_cakes.jpg
    small_cakes.jpg
    145.1 KB · Views: 0
  • large_cakes.jpg
    large_cakes.jpg
    182.7 KB · Views: 0
Looks really good pup. Love to see more pics as you dial it in. I've got a spare shower in my place that I've been thinking of putting a martha in so your experience will probably help shape what I decide to do.

great work... :)
 
I've seen all kinds of greenhouse setups and I guess putting one together has always seemed a bit daunting because many have all kinds of stuff attached... computer fans... hoses... multiple humidifiers.

So far, so good with a humidifier and fan... much simpler that I was expecting.
 
Good work! You are sparking my interests back into growing mushrooms again. I used to use plastic tubs with a water heater and small vents. I love your set up so much more, though. I may have to do some shopping soon :)
 
A couple of things going down over the next few days:

1)Plans to set the external fan up to help with FAE

2)Plans to attach a wide tube to the humidifier and move it outside the GH to avoid unnecessary moisture around the motor. Maybe a short piece of dryer vent material. I just don't want to create any extra pressure on the motor of the humidifier with a narrow tube.

3)Adding pans of perlite to empty rack space to aid in passive humidification

I'm really looking for that sweet spot of 95% + humidity and little or no condensation on the inside walls of the GH
 
After a week of having this thing going - it is doing better that I thought it would. Still need to up the FAE. I have long stipes, smallish caps and fuzzy bases - all signs of needing FAE.

Tomorrow I'll add perlite trays and set the external fan to blow on the GH more often.

It all ends up being like a big shotgun fruiting chamber to some extent. I encourage anyone who's been thinking about going this route to do so... it's really not any more difficult that getting used to any other fruiting chamber.

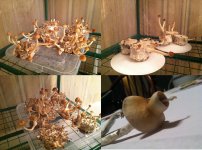
Here's a block of photos showing the first flush of the cakes after about 7 days. I'm pretty happy with the results.

Also in the pics is a cool mutant I thought I'd throw in, 'cuz I think mutants are cool. :)

---plans to put several trays in there as soon as they're colonized

Peace... more at 11
 

Attachments

  • comp.jpg
    comp.jpg
    237.5 KB · Views: 0
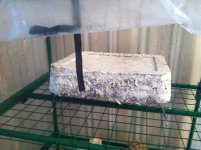
Birthed this yesterday. Removed it entirely from the tub because I was a good and didn't paint or tape the bottom to keep light out, so now there's pins on all 6 sides.

+10 mushroom growing sword to my lady for suggesting the baking cooling rack for the job.

This will be the benchmark. I intend to use big block cakes like this in the GH.
 

Attachments

  • IMG_0620+small.jpg
    IMG_0620+small.jpg
    131.3 KB · Views: 0
  • IMG_0621+small.jpg
    IMG_0621+small.jpg
    151.3 KB · Views: 0
Progress... more FAE. Have the fan running on the GH every 2 hours but still need more. I'm going to poke more holes in the cover - then I'll up the fan time if more holes doesn't achieve what I want.

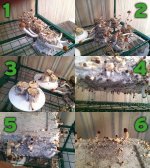
Pictures of the progress...

1) Chunks of colonized rye that were broke out of their jars and fruited for fun. First flush

2) 1/2 Pint Cakes that were dunked and rolled. Second flush

3) 1/4 Pint Cakes that were NOT dunked or rolled. Second flush (not too hot)

4) 10"x13"x3" Block - view of side and bottom - that was turned out onto a baking cooling rack. First flush (fruits on all 6 sides)

5) 10"x13"x3" Block - view of top front corner

6) 10"x13"x3" Block - view of top rear corner
 

Attachments

  • 8_10+Composite.jpg
    8_10+Composite.jpg
    680 KB · Views: 0
Pup, you are amazing! This is what I am going to do for my first grow when I move out of my current house. This is just purely amazing, and one of the best set ups for bulk mushrooms growing I have seen so far. The big tub that you used to make that big cake is a great idea, and seems like its going to produce a hell of a lot of fruits. I am excited to see that big cake once its ready to pick, please post some pictures of it!
 
Wait a minute here, that's too simple, we're adults...must be complicated!

Wow didn't know my path would be adjusted so quickly:d
Good stuff, almost looks like the covers that folks had in their storage closets for ladies/mens hats, corsages, etc. Ha, think they had moth balls in them, yuk stinky.
Thanks again for the show, awesome. I have 6 jars sitting after inoculation and on my 9th day of dark, so, yes I'm very happy to have seen this, the freaking huge substrate just had me drooling 😁
Virt
 
Once again the mushroom devas have smiled on my effort :)

First flush of the big block (10x13x3) is rocking. Initially I though the yield wasn't all that great, but if I had all those fruits on one side of the block (like I should have, but I was sloppy about it) I'd be (and am) pretty darn happy.

For the curious, the race is Red Boy.

This is the test of my plan... blocks like this in a greenhouse. There's nothing new here. Plenty of folks have done it and probably done it better. What I wanted to show is that using a greenhouse for this isn't difficult and that you can split your contam risk up some and still get into the bulk end of all this. It also allows for substrate sizes that can be easily mixed up in a still air box either for an added layer of contamination protection or perhaps for places that are experiencing extra contamination issues.

Some things to consider. My conditions are not "dialed in" at this point. Cubes are the easiest mushroom to grow. I need to tweak humidifier and fan to where the humidity and FAE are groovy,but not leaving much, if any, condensation on the walls. Standing, stagnant water is bad juju and I want to eliminate it. I also want to maximize what I get out of the blocks - that will come from optimal pinning conditions... which again has to do with FAE and evaporation. So still very much a work in progress. I won't post a bunch of pictures after this until these improvement occur.

More than ever, I plan on writing this all up, kind of as a two prong primer. One part getting into the GH setup and maintenance and the other dealing with the making of blocks/trays of substrate to be fruited therein. Cakes are a pain and bulk can be.... well.... bulky. This feels like a nice middle-of-the-road solution.

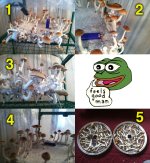
Pictures...

1 - 4) The block in all it's veil-popping splendor

5) The Fungal Booty - picked a little more than half the flush and it is two dehydrator trays worth - I'll give a final dry weight when the tally's all in (the final dry weigh of the harvest from that block was right around 3oz)
 

Attachments

  • 8_12+composite.jpg
    8_12+composite.jpg
    435.9 KB · Views: 0
I've got all the timers I need, a decent analog hygrometer, and a sufficient 6500k fluorecsent light fixture.

The blocks are working great and things are rolling.

I'm shooting for having 95% humidity, very little or no condensation on the inside of the greenhouse.

My starting point for the final dialing in has the fan blowing for 10 minutes every 2 hours and the humidifier coming on for 20 minutes just after the fan is done. I'll adjust from there.

I plan to put this all together as kind of a greenhouse tek. Any and all comments, constructive criticisms, and helpful info are surely welcome :)
 
That looks like exactly the greenhouse I have setup for my p. alba, p. viridis, and b. caapi plants! I will definitely try this out and let you know!
 
Tossing up some shroom porn here. Another block fruited in the greenhouse. I'm still working on improving the pinning aspect, but once I do I'll write up a tek for semi-bulk blocks that fit well and work well in a greenhouse. In the meantime... go grow shrooms!:thumb_up:
 

Attachments

  • IMG_0751sm.jpg
    IMG_0751sm.jpg
    143.1 KB · Views: 0
Back
Top Bottom