• Members of the previous forum can retrieve their temporary password here, (login and check your PM).

Struggling with horse manure pellets...

Migrated topic.

blue.magic

Rising Star
Most bulk substrate recipes I found call for something like 50% horse manure and 50% coir/verm to hold moisture as horse manure alone dries easily.

Unfortunately I have only horse manure pellets. 50 grams of these look like this:

zWqgphz.jpg


I though this will expand to same volume as normal horse poo, but unfortunately adding 100 ml water only resulted to about 150 ml of this manure at field capacity, no expansion happens, it's more like a dense soil-like mass:

9iKl5K0.jpg


Unfortunately, I have no idea how concentrated this manure is. It seems the manure pellets are fermented, pasteurized, dried, ground and then pressed.

One source said that 1 kg of the pellets is same as garden roller full of fresh manure. That's still not a very useful information.

So I think I will just mix in some of this into my coir/verm substrate and see how the mushrooms grow. So far I tried as little as 50 grams for a mini-monotub and the mycelium grows vigorously.

Any better ideas?
 
Another problem is that coir also comes in compressed bricks so even making 50:50 coir:verm is hard for me. Anyway, the recipe I made is:

300 ml horse manure (*)
190 ml coir (*)
360 ml verm (*)
100 ml peat moss (10% volume)
50 ml gypsum (5% volume)

(*) moistened to field capacity

This all adds to 1 liter of substrate. There is less than 30% horse manure as it is concentrated and I don't want to overdo it.

I hope this will work so I can have some substrate to optimize.
 
Looks good to me. Horse poop should be a good addition to a substrate for monotub grow. I think you will be ok if you use it. Stick to the monotub basics:

1) Final substrate at field capacity with fluffy texture: at least 30% coir basically guarantees good texture and is a must in my opinion. Optional 10% straw and 10% vermiculite also help. Up to 5% gypsum can cover up too much water mistakes witch is typical of beginners (I've been there) and soak up puddles. A dash of optional lime can slow down contamination and help mycelium win the colonization race to be the dominant organism in the tub. Note that it is the final substrate that needs to be at field capacity, not each individual ingredient.

2) Pasteurize. Keep it simple, directly pasteurizing the closed monotub in the oven (thermometer probe is your friend) with spawn mixing utensils inside is very efficient. Oven at low setting and preheated so the plastic does not melt. If unsure of melting, test first or use a different pasteurization method.

3) Mix in a good amount of colonized grain. Same amount of substrate by weight is a good safe amount. The more grain the better chances at winning the colonization race (but the more spawn you use).

4) Good airflow. Use a tried and true monotub design. Once closed after the initial grain mixing, a proper monotub remains closed and untouched for 10-20 days until it is time to collect a massive flush with a big smile on your face. Keep an eye on the mycelium, if it stops growing your monotub design may be poor and there is not enough fresh air getting in. If opening the lid and fanning gets the mycelium to run again you know that was your issue (go back to studying tried and true monotub designs: you did something wrong).

Keep it easy and simple and mushroom happiness awaits.
 
Loveall said:
Note that it is the final substrate that needs to be at field capacity, not each individual ingredient.

I know but as I said I have coir brick which is highly compressed and expands over 10 times as water is added. And I don't know how much it is compressed. The hpoo pellets are also compressed but do not expand. It is impossible for me to translate weights and volumes to equivalents to what others use (true dries manure, Black Kow, fluffy uncompressed coir etc.)

I know only after adding water so keeping all ingredients at field capacity and then mixing is my best bet to have the ratios close to what is provided in recipes (I assume the uncompressed ingredients in the recipes don't expand much).

In other words, if I use say 5 parts coir, it will become 50 parts after adding moisture. Completely throwing out ratios provided in most recipes.

I have already measured how much it expands but didn't want to throw out the substrate, hence I used it like that. I will use adjusted numbers in the next recipe.

Loveall said:
directly pasteurizing the closed monotub in the oven

Unfortunately my oven has lowest setting of 80 degrees centigrade, which is the top limit for pasteurization. Loading the substrate in jars and water bath works for me well.

Loveall said:
Mix in a good amount of colonized grain. Same amount of substrate by weight is a good safe amount.

Okay I will have to weigh it. I've read somewhere that spawn can be 10-50% of the final volume, but doint it by weight is far easier (though weight can be off depending on ingredients having varying density).

I know I may overcomplicate this, but I don't live in States so I can't get the exact same tried and tested ingredients everyone else uses... I have to adapt everything to what is available here.

Loveall said:
Good airflow. Use a tried and true monotub design. Once closed after the initial grain mixing, a proper monotub remains closed and untouched for 10-20 days until it is time to collect a massive flush

Are you sure about that?? I watched Willy Myco on YT who says one should mist and fan the monotub 4-6 times a day for fruiting (actually fan it at least one minute each time). And that is advised by someone who did 200+ monotubs.

Loveall said:
Keep it easy and simple and mushroom happiness awaits.

Thanks. I have already 4 mini monotubs going. The straw one now fruits and the coir/hpoo one colonizes though it seems to have stalled.
 
Yes, I'm sure monotubs are set and forget IF made a certain way.

See info here:


Frank uses a fan in the room, but I don't even use that and get good results. I'm lazy :d

If folks want to open their tub and enjoy that and get good results, that's ok too. It is just not really needed if the tub is designed a certain way.

Also, all my numbers above are dry weight.

Note: edited after some wise feedback from Ulim - thank you.
 
Loveall said:
Here is a close up of the current monotub I got going. Notice the dry area around the holes = good airflow. The wet areas = good moisture level (well at least not to dry). This tub has been closed since 12/21.


45765_d6f11dee-a48f-42d1-87db-0d3cfe56ec78_IMG_20180104_142158004.jpg

Yes that's exactly my design except I have more smaller bottom holes covered by micropore tape - I guess the result is the same.

By the way, do you have estimates how much coir, verm and manure you use by weight? I realized since my coir and manure is compressed, maybe I can mix them by weight to keep roughly same nutrient/filler ratio you have.

All the recipes are for cups and parts, though I need kilograms/pounds to adapt for my compactified ingredients.

Anyway, your tubs are insane and congrats for that :thumb_up: I can't wait to get near there.
 
Sure. This is not my recipe, I found it on the shroomery. I've lost the info on the original poster so sorry I can't give proper credit.


Substrate "Dry" Ingredients:

400g of coir

680g of black cow compost (not technically dry since the bag contents have 30% humidity, so in dry horse pellets this should be 476g of pellets and 124g of water)

132g of cut up straw

132g of vermiculite

60g of gypsum (optional, helps with water mistakes)

1 tablespoon of lime (optional, may help mycelium win the colonization race)


Procedure:

Pour 2700g of hot water over coir in monotub

After coir absorbs water, break it up

Add all other ingredients and mix

Test for field capacity add small amounts of water/verm if adjustments are needed. Keep track and write down adjustments so next time you don't need to adjust

Put in grain mixing utensils and oven thermometer probe into tub and close lid

Put tub in oven at lowest setting. Oven should be preheated to avoid melting during quick warmup. If concerned with melting plastic pasteurize with a different method (your personal choice).

Keep an eye on the oven thermometer's digital readout sitting on your counter, turn oven off when substrate gets to 150F

Leave substrate in oven (or take out after 1 hour, but oven is nice n clean), once it reaches 90F, mix in 6 or more colonized quart grain jars quickly in a clean area using the pasteurized utensils

Close lid and wait until a flush appears and is ready for harvest (10-25 days). Keep an eye on mycelium growth, if it stalls fan it and check monotub design if your goal is to "set and forget" (otherwise simply fan as desired but careful to not introduce contamination)
 
Thanks a lot :thumb_up:

I have currently 6 tubs going, of which only one started fruiting so far. I will test the recipe once there is room for more.
 
Here are some results. Second flush easily over 100 dry grams (picked right after first caps broke the vail).

Set and forget.

Since this is all for personal development going to do vacuum bag storage and freezing. Many grams from my earlier grows have slowly gone inactive while in dry storage at room temperature.

45765_44f4ca81-3dba-4427-82e8-8ce022b1152b_IMG-20180107-WA0002.jpeg


45765_27c98fe4-a225-443e-89b1-fae29ed1ed94_IMG_20180114_150249235.jpg
 
Loveall said:
Here are some results. Second flush easily over 100 dry grams (picked right after first caps broke the vail).

Set and forget.

Since this is all for personal development going to do vacuum bag storage and freezing. Many grams from my earlier grows have slowly gone inactive while in dry storage at room temperature.

Beautiful.

I started using fruit dehydrator set to about 40 C (104 F). It still does not kill the potency and get the fruits cracker dry in about 12 hours.

I did grain-to-gran transfer few days ago and now waiting for colonization of the spawn. I will then try your recipe and let you now.

I also love the "set and forget" approach as well as no brainer techniques.
 
Loveall said:
Sure. This is not my recipe, I found it on the shroomery. I've lost the info on the original poster so sorry I can't give proper credit.


Substrate "Dry" Ingredients:

400g of coir

680g of black cow compost (not technically dry since the bag contents have 30% humidity, so in dry horse pellets this should be 476g of pellets and 124g of water)

132g of cut up straw

132g of vermiculite

60g of gypsum (optional, helps with water mistakes)

1 tablespoon of lime (optional, may help mycelium win the colonization race)


Procedure:

Pour 2700g of hot water over coir in monotub

After coir absorbs water, break it up

Add all other ingredients and mix

Test for field capacity add small amounts of water/verm if adjustments are needed. Keep track and write down adjustments so next time you don't need to adjust

Put in grain mixing utensils and oven thermometer probe into tub and close lid

Put tub in oven at lowest setting. Oven should be preheated to avoid melting during quick warmup. If concerned with melting plastic pasteurize with a different method (your personal choice).

Keep an eye on the oven thermometer's digital readout sitting on your counter, turn oven off when substrate gets to 150F

Leave substrate in oven (or take out after 1 hour, but oven is nice n clean), once it reaches 90F, mix in 6 or more colonized quart grain jars quickly in a clean area using the pasteurized utensils

Close lid and wait until a flush appears and is ready for harvest (10-25 days). Keep an eye on mycelium growth, if it stalls fan it and check monotub design if your goal is to "set and forget" (otherwise simply fan as desired but careful to not introduce contamination)

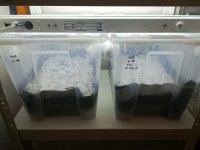
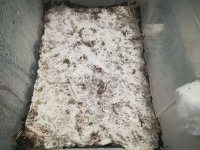
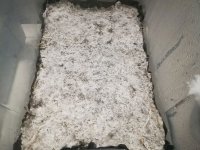
Many thanks, Loveall. I tried this recipe and it works wonderfully. I had to add quite a bit of water and got more substrate than needed (my monotub can fit about 5 liters and I had almost 15 liters in the end).

I also had to add quite a bit of water (about liter or so) but worried about overwatering, I made one monotub, then added more water and made second one. The more watered one colonized rapidly but now both are covered by white mycelium.

Also the "more watered" monotub was made with not fully colonized rye (not colonized fully even after inverting the jar - I made too small AE hole in the jar). I was afraid about contams, but now it looks beautiful and healthy :)
 

Attachments

  • IMG_20180228_125249.jpg
    IMG_20180228_125249.jpg
    136.7 KB · Views: 0
Loveall said:
Thanks for the update. I would consider adding more holes for air exchange loosely filed with polyfill. Do you have a second bottom row of holes to evacuate the heavier CO2? Any fruits yet?

I don't know. It's exactly same design I've seen most people use. I can make more holes but maybe after it is fully colonized as I don't want to disturb mycelium by vibrations from the drill and introduce contamination.

Yes there are like 16 small holes on the bottom, right above the substrate, not seen on the photo since the holes are like 5 mm in diameter and covered by the trash can bag. I will trim it once I found a little spare time and once the myc get stronger.

It's still colonizing, I don't think there will be any fruits yet as it's hardly two weeks from starting it and the weather is now exceptionally cold.
 
Melt the holes if you decide to do it. Using a soldering iron or hot nail will sidestep both the issues of vibration and (biological) contamination. If you can use a piece of thin pipe, that would make better holes.

The main issues with the melting technique would be to make sure that the hot implement is only just hot enough to melt the plastic, to minimise fumes and thermal shock to the mycelium. Maybe practise on an empty box first?
 
blue.magic said:
Loveall said:
Thanks for the update. I would consider adding more holes for air exchange loosely filed with polyfill. Do you have a second bottom row of holes to evacuate the heavier CO2? Any fruits yet?

I don't know. It's exactly same design I've seen most people use. I can make more holes but maybe after it is fully colonized as I don't want to disturb mycelium by vibrations from the drill and introduce contamination.

Yes there are like 16 small holes on the bottom, right above the substrate, not seen on the photo since the holes are like 5 mm in diameter and covered by the trash can bag. I will trim it once I found a little spare time and once the myc get stronger.

It's still colonizing, I don't think there will be any fruits yet as it's hardly two weeks from starting it and the weather is now exceptionally cold.

Ok, makes sense, I just could not see the extra holes. I would let it be then, sounds like you are all set (I assume the trash bag is not blocking the air exchange).
 
Loveall said:
blue.magic said:
Loveall said:
Thanks for the update. I would consider adding more holes for air exchange loosely filed with polyfill. Do you have a second bottom row of holes to evacuate the heavier CO2? Any fruits yet?

I don't know. It's exactly same design I've seen most people use. I can make more holes but maybe after it is fully colonized as I don't want to disturb mycelium by vibrations from the drill and introduce contamination.

Yes there are like 16 small holes on the bottom, right above the substrate, not seen on the photo since the holes are like 5 mm in diameter and covered by the trash can bag. I will trim it once I found a little spare time and once the myc get stronger.

It's still colonizing, I don't think there will be any fruits yet as it's hardly two weeks from starting it and the weather is now exceptionally cold.

Ok, makes sense, I just could not see the extra holes. I would let it be then, sounds like you are all set (I assume the trash bag is not blocking the air exchange).

Loveall, I have finally found one WillyMyco video [1] (the original YT channel is down) where he explains why he does not do FAE at all. He actually measured CO₂ levels in his 2.2 cubic feet monotub (approx 62 liters):

after 7 days of colonization - 950 ppm (quite high)
10 seconds after opening the lid - 400 ppm (basically outdoor fresh air level)
4 hours later - 425 ppm

These measurements indicate that just opening the lid for a few seconds is enough to flush CO₂ from a fairly large tub.

Another note is that higher CO₂ levels may be beneficial for initial growth (?), then flushing the air once day may be more than enough to get the mushrooms enough O₂.

At least we don't have to be too crazy about air exchange.

What do you think?

[1] YouTube video "MONOTUB ~ STEP BY STEP ~ MUSH ~ SHROOMS ~ PERFECT PINSET ( PART 2 OF 3 )" 12:13
 
I know the set and forget monotub technique works. The CO2 levels will equilibrate at some level above 400ppm to promote fruiting, but thanks to the lower rows of holes CO2 will not get too high if designed properly. That is why it is important to loosely pack the polyfill. Some "dial in" the set and forget monotubs, they adjust the holes and packing using previous results as feedback. Light and temperature will also affect how the heavy CO2 behaves and pools at the bottom and leaks out (light/heat can disperse CO2 up away from the bottom holes I think). "Dialing in" can be fun and with experience you can shape your fruits to be tall and skinny by letting less CO2 leak out. When growing reishi CO2 control can have dramatic effects and folks have shaped the fruits into long antlers in high CO2 environments.

If one wants to have a setup where they need to open the lid, that is fine too and is also known to work. Each individual can choose the technique they prefer (or try both at the beginning).

Both can give great results. I prefer the set and forget convenience along with other perks: (1) with an increased stable CO2 concentration you can aim for tall skinny fruits for added fun (they look elegant and seem easier to harvest, but if too skinny because holes don't exchange enough fresh air they fall over and/or the stems puff up). (2) I also like how the monotub stuffed holes create a separate stable atmosphere for the mushrooms, akin to transporting the mushrooms to a different planet.

Both paths can lead to pure love and infinite oneness, which is what matters at the end of the day.

PS: here is a neat story that just came out about how ancients used CO2 pooling to put on a show: https://www.cnn.com/2018/03/09/world/mystery-gates-to-hell-hierapolis/index.html
 
Thanks, Loveall, for further clarification. Yes I remember Willy Myco liked to mist and fan his monotubs evey day. FAE is probably a way to go for the "set and forget" approach which I also like more. I feel like both mushrooms and cacti like less attention than more.

Here are my two monotubs spawned on Feb 18 and still not fruiting :cry: There is a single fruit in the first monotub but no signs of any more growth. I don't know how long it usually takes from spawning to fruiting, but last two weeks were extremely cold (the temp usually dropped to 17° C / 62° F) so I bought a room heater. Now it finally gets warmer outside.

I look forward for getting real horse manure in summer and some polyfill instead of cotton (better air exchange probably). Maybe covering the CO2 holes with micropore tape will help with better sterility.
 

Attachments

  • IMG_20180310_221249.jpg
    IMG_20180310_221249.jpg
    189.4 KB · Views: 0
  • IMG_20180310_221309.jpg
    IMG_20180310_221309.jpg
    192.8 KB · Views: 0
That picture with one little mushroom is pretty cool, never seen something like that :love:

Those tubs seem ready to explode. Were these set and forget? Can you see any areas of denser mycelium? If they insist on not fruiting with higher temps after 1-2 weeks you may need to intervene to help get they hyphal knots going.
 
Back
Top Bottom