GraemeCarl
Rising Star
Hi All,
Over last four years I have experimented with many designs for homemade pipes including a number that are detailed here on the Nexus. All of these work, but seem very hard to get right every time. My goal for this pipe has been to make an easy 'sure fire' 'works every time' and one that doesn't have a learning curve.
I'd like to share this latest design with you, and I'm calling it 'The Gandalf'
(it works like magic - and making a 'Sherlock' shape was too hard for me )
)
This design is working quite nicely and I have measured the vaping efficiency at 100% for single breath launches. (I weigh the copper spice wick/holder before and after using a milligram scale to validate that all spice is consumed in a single toke)
The design principles I've used are as follows:
- Low thermal mass (the less there is to heat in the vaporization chamber the better)
- High surface area for the spice (wick is way better than kitchen scrub)
- Convection only, no conduction or radiation
- Glass leading away from the main chamber so vapor can be viewed
- Nothing purchased that is not readily available at the local shops
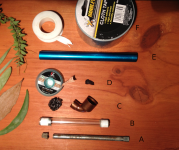
Components: (see attached images)
A - LHS: Stainless steel screen RHS: The large steel pin I used to form the 'basket' shape so it neatly fits into the glass tube
B - A short glass tube (inside diameter should be at least 10mm)
C - LHS: Stainless steel scrub, RHS: Copper pipe adapter (non threaded solder type)
D - LHS: Solder wick (electronic supplies), RHS: a short length of it cut and coiled up to use as a spice pad
E - Aluminum tube (hardware shop or head shop if you want a nice color)
F - LHS: Teflon tape, RHS: Cloth tape
Assembly:
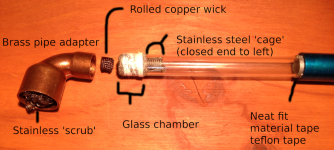
Wind some cloth tape around both ends of the glass tube until they loosely fit the brass adapter and the aluminum tube, then 'finish' the fit by adding a few winds of teflon tape until it is just 'snug'. (Heat from running the pipe isn't high enough to melt either of the tapes and since you will be disassembling for loading and cleaning, teflon makes a nice re-usable seal)
Make up a stainless steel cylindrical 'cage' that fits snugly down the center of the glass tube - I used steel mesh from a broken french press coffee maker and pressed it over the end of a steel pin to get it into the right 'basket' shape, (a 'silver screen' from a smoke shop works fine also). Place the cage over the top of a chop stick and insert it into the glass tube from the end you will breath from. Slide it almost to the end, the closed end of the mesh cage forms a 'floor' for your vaporization chamber. You can easily adjust the size of this chamber if required.
Now we have an 'all glass chamber' with a stainless steel floor. Most pipes and vaporizers use a metal chamber. We are using a glass chamber which is very fast to heat up and doesn't radiate or conduct heat into the spice. The only way it can heat is by the air passing through the chamber.
Finally we can make up our spice pad by cutting a short length of the copper 'solder wick' and coiling it up as shown. Make sure you blast it with a torch until it glows red before using the first time, as new solder wick has some 'resin' on it you want to burn away.
Usage:
Now we can add spice to the wick using your preferred method (I use an IPA or Acetone tincture so I can measure exact amounts by number of drops) I also like to weigh with milligram scales so I know exactly what I'm getting.
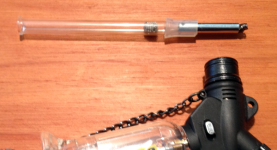
Finally load the wick into the chamber so air can easily pass through it, attach the brass pipe fitting stuffed full of stainless steel scrub (it will fit over the chamber) and you are ready to launch.
Since there is a right angle in the brass fitting it is fine to get the scrub red hot with a torch before we begin to draw air through it. You might also like to pre-heat the glass tube (carefully) to reduce condensation of your spice.
I hope this is useful to someone or helps to inspire new designs.
Stillness,
Graeme.
Kudos:
Thanks to the following trailblazers for inspirational designs:
1) OpeningPandorasBox for 'The Key' (pipe fittings are awesome)
2) amor_fati for 'The Inspirator' (shaping baskets and using glass tubes)
3) ???? for 'The Machine' (for proving how much we can do with so little)
Over last four years I have experimented with many designs for homemade pipes including a number that are detailed here on the Nexus. All of these work, but seem very hard to get right every time. My goal for this pipe has been to make an easy 'sure fire' 'works every time' and one that doesn't have a learning curve.
I'd like to share this latest design with you, and I'm calling it 'The Gandalf'
(it works like magic - and making a 'Sherlock' shape was too hard for me
 )
)This design is working quite nicely and I have measured the vaping efficiency at 100% for single breath launches. (I weigh the copper spice wick/holder before and after using a milligram scale to validate that all spice is consumed in a single toke)
The design principles I've used are as follows:
- Low thermal mass (the less there is to heat in the vaporization chamber the better)
- High surface area for the spice (wick is way better than kitchen scrub)
- Convection only, no conduction or radiation
- Glass leading away from the main chamber so vapor can be viewed
- Nothing purchased that is not readily available at the local shops
Components: (see attached images)
A - LHS: Stainless steel screen RHS: The large steel pin I used to form the 'basket' shape so it neatly fits into the glass tube
B - A short glass tube (inside diameter should be at least 10mm)
C - LHS: Stainless steel scrub, RHS: Copper pipe adapter (non threaded solder type)
D - LHS: Solder wick (electronic supplies), RHS: a short length of it cut and coiled up to use as a spice pad
E - Aluminum tube (hardware shop or head shop if you want a nice color)
F - LHS: Teflon tape, RHS: Cloth tape
Assembly:
Wind some cloth tape around both ends of the glass tube until they loosely fit the brass adapter and the aluminum tube, then 'finish' the fit by adding a few winds of teflon tape until it is just 'snug'. (Heat from running the pipe isn't high enough to melt either of the tapes and since you will be disassembling for loading and cleaning, teflon makes a nice re-usable seal)
Make up a stainless steel cylindrical 'cage' that fits snugly down the center of the glass tube - I used steel mesh from a broken french press coffee maker and pressed it over the end of a steel pin to get it into the right 'basket' shape, (a 'silver screen' from a smoke shop works fine also). Place the cage over the top of a chop stick and insert it into the glass tube from the end you will breath from. Slide it almost to the end, the closed end of the mesh cage forms a 'floor' for your vaporization chamber. You can easily adjust the size of this chamber if required.
Now we have an 'all glass chamber' with a stainless steel floor. Most pipes and vaporizers use a metal chamber. We are using a glass chamber which is very fast to heat up and doesn't radiate or conduct heat into the spice. The only way it can heat is by the air passing through the chamber.
Finally we can make up our spice pad by cutting a short length of the copper 'solder wick' and coiling it up as shown. Make sure you blast it with a torch until it glows red before using the first time, as new solder wick has some 'resin' on it you want to burn away.
Usage:
Now we can add spice to the wick using your preferred method (I use an IPA or Acetone tincture so I can measure exact amounts by number of drops) I also like to weigh with milligram scales so I know exactly what I'm getting.
Finally load the wick into the chamber so air can easily pass through it, attach the brass pipe fitting stuffed full of stainless steel scrub (it will fit over the chamber) and you are ready to launch.
Since there is a right angle in the brass fitting it is fine to get the scrub red hot with a torch before we begin to draw air through it. You might also like to pre-heat the glass tube (carefully) to reduce condensation of your spice.
I hope this is useful to someone or helps to inspire new designs.
Stillness,
Graeme.
Kudos:
Thanks to the following trailblazers for inspirational designs:
1) OpeningPandorasBox for 'The Key' (pipe fittings are awesome)
2) amor_fati for 'The Inspirator' (shaping baskets and using glass tubes)
3) ???? for 'The Machine' (for proving how much we can do with so little)


