
So here we pick up where we left off in this thread:
...Where we combine digital and analog techniques to create hybrid multimedia art. The idea with this project is to show a few straightforward Photoshop tricks that will allow you to take your drawings (pencil, charcoal, marker, whatever you want) and go to some entirely new places with them. I've created this with newer Photoshop users in mind.
The techniques I'm showing here are kind of unorthodox, a little down-and-dirty. It's the opposite of how a meticulous digital graphic artist would probably work. But it's fast, flexible, and appeals to my painter's approach. What you're seeing here took about 2 hours, including Photoshop, typing and a bowl break.
Note: You can do this stuff with a mouse, but seriously, do yourself a favor and buy the $89 Wacom tablet.
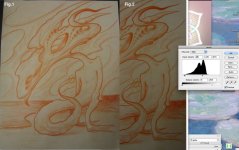
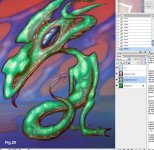
For this thread I'm using a drawing that was volunteered by Cosmic Learning (Thanks C.L.!) and so will be a collaboration when finished. In Fig.1 is the photo he sent me; Fig 2 is what I did to it with Levels in Photoshop (Command/L). the purpose was to darken the whole thing to a nice medium gray, a deep enough shade to lift some meaningful highlights from. Shadows were darkened a bit too. After that, I duplicated the layer (Layer/Duplicate layer) and selected the top layer in the Layers Palette, for reasons that I'll go into shortly.
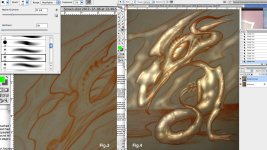
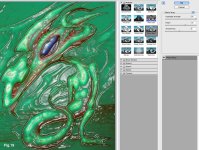
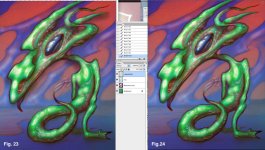
Next, I selected the Dodge Tool (the black lollipop thing in the Tool Palette), set it to Highlights in the Options Bar, gave it a nice big diameter and soft feather, and used that to lift up large light areas throughout the piece (Fig. 3). I then went to a smaller diameter and used it to work the detail, in particular bringing out textures in the foreground figure (Fig. 4).
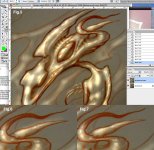
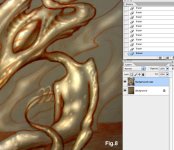
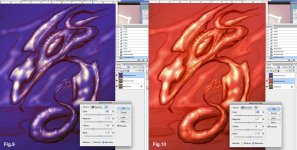
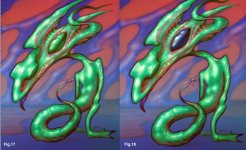
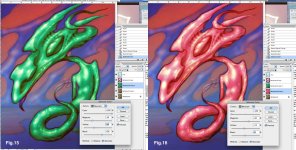
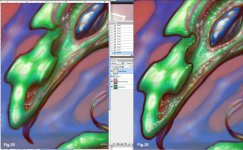
Next, in the same dropdown box as the Dodge Tool is the Burn Tool (the white hand thing), set to Shadows in the Options Bar, which is then used to darken the shadows and outlines throughout the piece (Fig. 5). After that, an eraser is used to clean up any overspray from the large brushes, such as in Fig. 6-7, where you can see part of the background that was inadvertently lightened by the Dodge Tool. By using a small sharp-edged eraser, this area can be cleaned up, revealing the unaltered layer underneath, as in Fig. 8. With the piece all cleaned up, the two layers can be merged (Command/E). We now have our finished basic value work.
...Where we combine digital and analog techniques to create hybrid multimedia art. The idea with this project is to show a few straightforward Photoshop tricks that will allow you to take your drawings (pencil, charcoal, marker, whatever you want) and go to some entirely new places with them. I've created this with newer Photoshop users in mind.
The techniques I'm showing here are kind of unorthodox, a little down-and-dirty. It's the opposite of how a meticulous digital graphic artist would probably work. But it's fast, flexible, and appeals to my painter's approach. What you're seeing here took about 2 hours, including Photoshop, typing and a bowl break.
Note: You can do this stuff with a mouse, but seriously, do yourself a favor and buy the $89 Wacom tablet.
For this thread I'm using a drawing that was volunteered by Cosmic Learning (Thanks C.L.!) and so will be a collaboration when finished. In Fig.1 is the photo he sent me; Fig 2 is what I did to it with Levels in Photoshop (Command/L). the purpose was to darken the whole thing to a nice medium gray, a deep enough shade to lift some meaningful highlights from. Shadows were darkened a bit too. After that, I duplicated the layer (Layer/Duplicate layer) and selected the top layer in the Layers Palette, for reasons that I'll go into shortly.
Next, I selected the Dodge Tool (the black lollipop thing in the Tool Palette), set it to Highlights in the Options Bar, gave it a nice big diameter and soft feather, and used that to lift up large light areas throughout the piece (Fig. 3). I then went to a smaller diameter and used it to work the detail, in particular bringing out textures in the foreground figure (Fig. 4).
Next, in the same dropdown box as the Dodge Tool is the Burn Tool (the white hand thing), set to Shadows in the Options Bar, which is then used to darken the shadows and outlines throughout the piece (Fig. 5). After that, an eraser is used to clean up any overspray from the large brushes, such as in Fig. 6-7, where you can see part of the background that was inadvertently lightened by the Dodge Tool. By using a small sharp-edged eraser, this area can be cleaned up, revealing the unaltered layer underneath, as in Fig. 8. With the piece all cleaned up, the two layers can be merged (Command/E). We now have our finished basic value work.

") lol
lol