
MasonJarBong
Rising Star
Note:
Before I go further I would like to acknowledge the assistance of Spaced Out 2, who generously and patiently answered my questions and advised me based upon his own grow from seed. Thank you again!
I was recently able to obtain some Salvia Divinorum seeds and have begun my first grow. I thought it might prove useful to document my experiences here since there are not very many salvia grows from seed, in spite of a few recent ones. Perhaps my successes (or failures) will prove useful to other growers seeking to cultivate salvia from seed. At the very least I can illustrate what not to do!
I intend to post semi-regular updates until the seedlings are established, then will update less frequently as the plants are hardened off and settle in to mature.
Seeds
This grow began with a 10-pack of seeds, of which I have now sown four. If you have never laid eyes upon Salvia Divinorum seeds, they are smaller than you might expect. They are MUCH smaller than a cannabis seed (perhaps 1/10th the diameter). Were you to drop a Salvia Divinorum seed onto a carpeted floor, you would likely never find it. Exercise great care anytime you handle them. When storing Salvia Divinorum seeds, keep them some place dark, dry, and relatively cool. It is my understanding that Salvia Divinorum seeds will remain viable for 1-2 years when properly stored.
Equipment List
(Not every item included below is necessary. You could certainly get by on less.)
- propagation tray and humidity dome (with adjustable vent holes)
- seedling heat mat and thermostat
- 13W (75W equivalent) LED light bulb (5000K)
- light timer
- small Jiffy Pots
- soil (Happy Frog)
- perlite
- spray bottle
- distilled water
- digital thermometer/hygrometer
- T5 6500K light fixture (will use once plants mature)
Sowing and Germination
I chose to add a small amount of perlite to my soil mix. Happy Frog already contains perlite and other aerative amendments, but since I am growing in a humid climate, I opted for some additional aeration mainly for fear of mold and damping off. The extra perlite might not have been necessary, but better safe than sorry. The soil mixture was saturated to capacity before being placed into the Jiffy pots, filling them nearly to the top. I then lightly tamped the soil to settle it. Next I created a very small and shallow depression in the center of each pot, gently pushing down on the soil. My intention here was to create a small void for the seed where there was less danger of the seed falling between soil particles and settling too deeply into the pot. Salvia Divinorum seeds should be sown at a depth of 2-3mm, so it would be a simple matter to bury them too deeply.
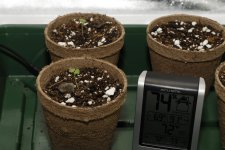
Once the seeds were sown and very lightly covered with bits of soil, the pots were placed inside a small propagation tray and humidity dome. Both exhaust vents were opened for purposes of air exchange. A 13W (75W equivalent/5000K) LED light bulb was placed over the humidity dome. With the aid of a seedling heat mat and thermostat, temperatures were maintained between 73-77F. Relative humidity levels ranged between 70-90%, but mostly towards the lower end of the range except immediately after periodic rehydration of the soil surface. Soil surface was misted daily with a very gentle spray, while avoiding spraying directly onto the spot where each seed rested (for fear of dislodging the seed or soil atop it).
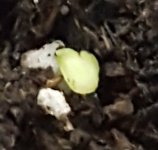
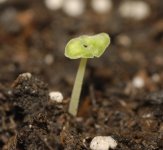
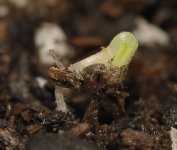
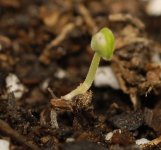
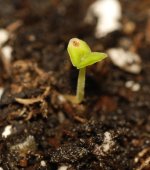
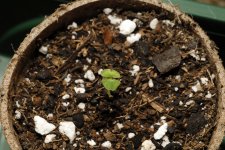
The first sprout appeared after 6 days. The second sprout appeared the next morning on day 7. As of this writing (day 7), the remaining two seeds have not yet sprouted.
Before I go further I would like to acknowledge the assistance of Spaced Out 2, who generously and patiently answered my questions and advised me based upon his own grow from seed. Thank you again!
I was recently able to obtain some Salvia Divinorum seeds and have begun my first grow. I thought it might prove useful to document my experiences here since there are not very many salvia grows from seed, in spite of a few recent ones. Perhaps my successes (or failures) will prove useful to other growers seeking to cultivate salvia from seed. At the very least I can illustrate what not to do!
I intend to post semi-regular updates until the seedlings are established, then will update less frequently as the plants are hardened off and settle in to mature.
Seeds
This grow began with a 10-pack of seeds, of which I have now sown four. If you have never laid eyes upon Salvia Divinorum seeds, they are smaller than you might expect. They are MUCH smaller than a cannabis seed (perhaps 1/10th the diameter). Were you to drop a Salvia Divinorum seed onto a carpeted floor, you would likely never find it. Exercise great care anytime you handle them. When storing Salvia Divinorum seeds, keep them some place dark, dry, and relatively cool. It is my understanding that Salvia Divinorum seeds will remain viable for 1-2 years when properly stored.
Equipment List
(Not every item included below is necessary. You could certainly get by on less.)
- propagation tray and humidity dome (with adjustable vent holes)
- seedling heat mat and thermostat
- 13W (75W equivalent) LED light bulb (5000K)
- light timer
- small Jiffy Pots
- soil (Happy Frog)
- perlite
- spray bottle
- distilled water
- digital thermometer/hygrometer
- T5 6500K light fixture (will use once plants mature)
Sowing and Germination
I chose to add a small amount of perlite to my soil mix. Happy Frog already contains perlite and other aerative amendments, but since I am growing in a humid climate, I opted for some additional aeration mainly for fear of mold and damping off. The extra perlite might not have been necessary, but better safe than sorry. The soil mixture was saturated to capacity before being placed into the Jiffy pots, filling them nearly to the top. I then lightly tamped the soil to settle it. Next I created a very small and shallow depression in the center of each pot, gently pushing down on the soil. My intention here was to create a small void for the seed where there was less danger of the seed falling between soil particles and settling too deeply into the pot. Salvia Divinorum seeds should be sown at a depth of 2-3mm, so it would be a simple matter to bury them too deeply.
Once the seeds were sown and very lightly covered with bits of soil, the pots were placed inside a small propagation tray and humidity dome. Both exhaust vents were opened for purposes of air exchange. A 13W (75W equivalent/5000K) LED light bulb was placed over the humidity dome. With the aid of a seedling heat mat and thermostat, temperatures were maintained between 73-77F. Relative humidity levels ranged between 70-90%, but mostly towards the lower end of the range except immediately after periodic rehydration of the soil surface. Soil surface was misted daily with a very gentle spray, while avoiding spraying directly onto the spot where each seed rested (for fear of dislodging the seed or soil atop it).
The first sprout appeared after 6 days. The second sprout appeared the next morning on day 7. As of this writing (day 7), the remaining two seeds have not yet sprouted.


")