• Members of the previous forum can retrieve their temporary password here, (login and check your PM).

True E mesh convection !. and ceramic health stone ..

Migrated topic.
Yes the mesh was definitely rather close! Some of the seeds got thoroughly toasted... As mentioned, things improved greatly on dialling back the wattage considerably.

In principle, the RTDA air tube could be extended some more - at present there's not much space for things and this is in large part the reason for the close proximity of the seed basket to the heating mesh.

I may yet also swap out the mesh to get a lower temperature over a larger area. If I'm not mistaken, this should give a similar level of heating for the air stream but with less radiant heat. I think the radiant heat was a large factor in the scorching.
 
downwardsfromzero said:
Yes the mesh was definitely rather close! Some of the seeds got thoroughly toasted... As mentioned, things improved greatly on dialling back the wattage considerably.

In principle, the RTDA air tube could be extended some more - at present there's not much space for things and this is in large part the reason for the close proximity of the seed basket to the heating mesh.

I may yet also swap out the mesh to get a lower temperature over a larger area. If I'm not mistaken, this should give a similar level of heating for the air stream but with less radiant heat. I think the radiant heat was a large factor in the scorching.


quote...[[there's not much space for things]] ....

thats why i simply used a short length of 3/8 copper tubbing... [about... 1 and 1/2 inch long peice of tubbing...

you need to set the seed basket 1/4 inch or less above the heating mesh.[should not touch the mesh at all] you are using hot air only to vaporize....it should work much better..

you can adjust the compressed screen ..by pushing it up or down..very easily..

with the copper tubbing ..you would even have room for changa! :thumb_up:
 
Yep, I made sure the basket doesn't touch the heating mesh. I could probably fit all sorts of things into the glassware that connects into the top of the atomiser (where you have used the copper tubing). It's a still head so the thermometer port makes loading and adjusting screens and materials potentially very simple.

I'll be having another tinker along these lines and will report back with results.
 
I did a product test again with my convection E mesh..using copper tubbing..and found.... pushing the fire button only once works well set at the right wattage or temp setting..

i think using copper tubbing helps to maintain the heat as it flows through the molecule/..


[[how well is your glass bowl working?... downwardsfromzero /?]]


before vaping... the molecule had been .. embedded and crystalized... in my chamber screen for atleast a week or longer..

It was only a threshold dose of molecule...[but amazingly strong effect!]..I simply set it to 50 watts using a bubbler to keep it cool... [then press down on fire button only once].... and...count to 3... still while holding fire button down... take my draw! ....convection vapor came fast and easy..under 10 seconds!


everything done during holding the fire button .. less than 10 seconds!

Its possible using only [45 watts].. might also work this way...

The vapor was very ..light...and tastless!!

I held in the vapor for only 6 or 7 seconds..and it still hit me good... a good 25 minute experiance!...on only a threshold dose!

This was 100 percent straight [SP] ...and came on very smooth and tastless...

Im very surprised that there hasnt been much testomonials on ..[Convection E Mesh].. ..because i believe it has benefits over the ..[conduction].. method ...

Its gotten lots of veiws on this thread...someone else must have had the same success ive had! would love to hear from them..😁
 
Starway7,

This tread inspired some testing and yes fantastic results.

I enjoy being out doors but it’s often windy and even a torch with gvg has been finicky. Now it’s just: find the space and launch.

I have engineered my rig with:
- Aegis mini mod
- Wotofo Profile 1.5 RDA (but with a Vandy vape mesh v2 25mm outer cap)
- nexMESH CHILL mesh
- Sai Poseidon Bubbler V2
- 3/8” copper tube trough a snug fitting drip tip
- two small portions of concentrate pad

The copper tubing and nexMESH are the key points to good convection heat.
I have found a second piece of concentrate pad is needed to hold in the fluffy crystals. Like a sandwich method of sorts.. This allows for faster thicker draws but still without any burning.

Also a cake icing attachment (small metal cone) can just be dropped into the top of the copper tube for easy loading.
The one design point that’s a bit cobbled is the outer diameter of the drip tip needs to be built up a bit (used foil tape) to fit snug into the bubbler.
I may do a write up with pics eventually.

Thanks for your work!
IME this beats GVG and direct on mesh! Sure fire each time. Now just to refine the setup a bit more.

Forgot to mention the vandy vape cap has a flat metal “floor” which protects the drip tip from too much heat. Saw that was an issue you had prior.
Peace
 
clearlyone said:
Starway7,

This tread inspired some testing and yes fantastic results.

I enjoy being out doors but it’s often windy and even a torch with gvg has been finicky. Now it’s just: find the space and launch.

I have engineered my rig with:
- Aegis mini mod
- Wotofo Profile 1.5 RDA (but with a Vandy vape mesh v2 25mm outer cap)
- nexMESH CHILL mesh
- Sai Poseidon Bubbler V2
- 3/8” copper tube trough a snug fitting drip tip
- two small portions of concentrate pad

The copper tubing and nexMESH are the key points to good convection heat.
I have found a second piece of concentrate pad is needed to hold in the fluffy crystals. Like a sandwich method of sorts.. This allows for faster thicker draws but still without any burning.

Also a cake icing attachment (small metal cone) can just be dropped into the top of the copper tube for easy loading.
The one design point that’s a bit cobbled is the outer diameter of the drip tip needs to be built up a bit (used foil tape) to fit snug into the bubbler.
I may do a write up with pics eventually.

Thanks for your work!
IME this beats GVG and direct on mesh! Sure fire each time. Now just to refine the setup a bit more.

Forgot to mention the vandy vape cap has a flat metal “floor” which protects the drip tip from too much heat. Saw that was an issue you had prior.
Peace


Great to hear its working well for you..the tastless light convection vapor does the job well!

I just use a molded screen cap .in photos in above posts]... to sandwish down ...[anything like solid loose particles]..i fear might come up into my mouth...but i use a bubbler [as a water trap]] and that also works well to cool and trap unwanted particles...

[Sp] alone will usually just vaporize and can be inhaled [usually without any solid airborn particles] to come up..

But if you are trying a changa mix..the screen cap..[should hold the product down ]...

The...[Sai Poseidon Bubbler V2] was a nice choice for a bubbler! i may get that one for my mod...

The convection vapor is so light and tastless.. ...that one might think its weak...

But the vapor is quite effective..once the toke is held in as long as posible...even for a short 5 to 7 seconds..

With convection vapor its almost tasteles ...and doesnt have that heavy acidity that some conduction vapor produces if the temperature is too hot..or too cold...

Since its very easy to top load the mod without spilling product.... ...its real easy ..to put too large of a dose in!! ....so be carefull!.. and.... ALWAYS!...weigh the product first!

[example..if you think you can just put enough product in the chamber for 5 or 6 people and pass it around..your first vapor hit could surprise you.. and be mercylessly strong! be carlfull and weigh what you are vaping first..


[clearlyone]...[Please send photos of your rig when you can!:thumb_up:

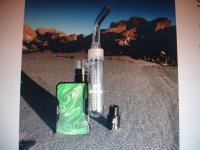
below is a picture of mod rigged with a..[Sai Poseidon Bubbler V2].looks great!
 

Attachments

  • DSC00457.JPG
    DSC00457.JPG
    3.1 MB · Views: 3
I hope to post some pics but it won’t be for a bit.

Starway7, i am curious if you tend to draw slowly. I tried that for a while but found moderate breath similar to a comfortable but intentional relaxing breath to get the vapor thicker and expend the product in fewer draws (which I tend to need). That practice started causing crystals to fly up out of the copper tube -hence the second bit of concentrate fill. I run it at 55 watts and pulse on for 10 seconds repeating so I don’t hit the timeout - until the draw is almost done.

Love this reliable convection method. It’s nearly tasteless except for a bit of heat. And absolutely -a mg scale.

My drive is to engineer it a bit better. It would be nice if it could be reduced to a combination of of-the-shelf parts. I have read that the S&B Mighty with water bubbler is also a sure fire convection method. It’s pricey tho.
 
clearlyone said:
I hope to post some pics but it won’t be for a bit.

Starway7, i am curious if you tend to draw slowly. I tried that for a while but found moderate breath similar to a comfortable but intentional relaxing breath to get the vapor thicker and expend the product in fewer draws (which I tend to need). That practice started causing crystals to fly up out of the copper tube -hence the second bit of concentrate fill. I run it at 55 watts and pulse on for 10 seconds repeating so I don’t hit the timeout - until the draw is almost done.

Love this reliable convection method. It’s nearly tasteless except for a bit of heat. And absolutely -a mg scale.

My drive is to engineer it a bit better. It would be nice if it could be reduced to a combination of of-the-shelf parts. I have read that the S&B Mighty with water bubbler is also a sure fire convection method. It’s pricey tho.

As far as speed of intake..i usually go with ..medium slow tokes..But must remember that the amount of outside air thats being pulled through is adjustable .. [and has a strong effect]..by blocking off some of the the air intake holes on the RDA cap..with an externall peice of scotch tape..

Looking back at the origional EMESH ..[conduction method].. because the spice is in physical contact with the hot mesh..it ..[vaporizes and can partially burn ].. the product very quickly!

So one thing thats positive about the conduction method is.. [[its speed of vaporization]]...

So first i would ...[[hit the fire button a couple quick times]] ..and melt ..[lock]..the crystals into the chamber screen first!... to avoid crystals from flying upward into the stem.. ...then there are no loose crystals to fly upwards...

Then the air temp must be set hot enough for ........
[fast and compleate as posible vaporization of the molecule]

remember . in early tests... i was doing a couple pre heats till it timed out as a vaping method.. ...but found that simply increasing the wattage ..[heat]..made it possible to vaporize by pressing down the fire button only once..

Also..Ive been using fairly low doses of the product durring tests..[usually threshold doses] and ..the smaller the dose.. the easier it is to compleatly vaporize...

The ..[air flow and heat needed].. is an accurate ballence to more compleaty vaporize the product...[i tape off the tiny air flow holes in top cap as a way of adjusting the air flow]

[the less outside air.. flowing g through the product.. causes hotter but slower flowing air]

There is one thing about the the conduction method..its speed of vaporization!

There is more than enough heat in a 70 or 100 watt mod to do the job.. it just finding a good ballence of external air and heat aplacation...

I find with my lower dose [threshold doses] over 90 percent of the material is quickly vaporized without burning anything..

The product needs to be close ..[above the heat mesh] ..but not touching..maybe 1/4 inch more or less .. above the heating mesh should work ..

when using sp tincture.. not crystals .. one must apply 2 or 3 drops of it at a time .. on screen and wait 5 minutes for the liquid to evaporate enough to leave the sticky molecule to remain locked into the ..chamber screen..then... not being in a hurry... i sometimes wait several hours or all night or even days.. untill the the actives have re crystalized .. while being locked into the screen ..or stainless pad..

Also when doing testing .. its not easy to keep taking hits every day!.. ..especially from 30mg doses..

when just testing vaporizer output... [several times a day] ..
...one MUST!.. use only small threshold doses...

....or devise a ..[mechanicle way].. to take pulls..using an air pump and clear tubbing..simmilar to volcano..alowing the vapor to collect into a test holding bag or jar...for test purposes..


Sitting in the station with ticket ..I boarded the train ..

The train was fast..the trip was timeless..:thumb_up:

It was really visual using a black out sleep mask! [pure convection]..:thumb_up:
 
clearlyone said:
I hope to post some pics but it won’t be for a bit.

Starway7, i am curious if you tend to draw slowly. I tried that for a while but found moderate breath similar to a comfortable but intentional relaxing breath to get the vapor thicker and expend the product in fewer draws (which I tend to need). That practice started causing crystals to fly up out of the copper tube -hence the second bit of concentrate fill. I run it at 55 watts and pulse on for 10 seconds repeating so I don’t hit the timeout - until the draw is almost done.

Love this reliable convection method. It’s nearly tasteless except for a bit of heat. And absolutely -a mg scale.

My drive is to engineer it a bit better. It would be nice if it could be reduced to a combination of of-the-shelf parts. I have read that the S&B Mighty with water bubbler is also a sure fire convection method. It’s pricey tho.

quote..
[I have read that the S&B Mighty with water bubbler is also a sure fire convection method.]


...Ive talked to a mighty owner...and it seems that the mighty is not 100 percent convection...

Its a 50/50 .mix of conduction and convection...he said...

cheers...


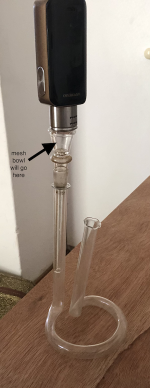
Is there any concern with firing while the mod is upside down? Below is my potential setup, I will put a mesh bowl in the glass pipe and load the spice there. Some water will go in the looped compartment for cooling.

I am afraid that the silicone/plastic apparatus below the conduction mesh of the wotofo atomizer will melt or burn. Though I suppose the material is not prone to melting since it is used in the vape in the first place.
 

Attachments

  • IMG_4635.png
    IMG_4635.png
    294.4 KB · Views: 4
Woolmer said:
Is there any concern with firing while the mod is upside down? Below is my potential setup, I will put a mesh bowl in the glass pipe and load the spice there. Some water will go in the looped compartment for cooling.

I am afraid that the silicone/plastic apparatus below the conduction mesh of the wotofo atomizer will melt or burn. Though I suppose the material is not prone to melting since it is used in the vape in the first place.

Looks like a sharp idea! good use of the noodle!

just holding the mod heat sorce..firmly over a glass or metal bowl might work...!
You could try this method it might work [you might need a tighter connection between mod and bowl [posibly metal sleived conector]..to prevent heat loss].. .. this might even hold [suport]..the mod in place...like a stand] .. if you add metal sleeved connectors to bowl and mod..... after you safely let go of fire button..

this heating method appears simmilar to aplying a torch lighter to the bowl...[only your using very hot air instead of flame...

.... remember...[with mod being upside down] .heat always rises..and exsesive heat is hard on the mods electronics..could cause the mods overheat protection...[if it has one].. [to time out] to shut off the mod faster !.. giving you less seconds to vape?

the hotter the mod gets... the less safe it is ,..in my opinion...you dont want to catch the mods battery on fire! those batterys can explode... and shoot fire out like a torch... set off your smoke alarm catch things on fire!!.. and attract unwanted atention...

the mod catching on fire.. probibly wont happen.. but the cooler your mod is ..the safer its operation in my opinion..

As long as you dont hold the fire button down too long.. the mod will probibly survive...

Running hot air through the product in bowl is the right idea for convection vapor...

as long as you have a.... glass or metal damper..[bowl].. between the plastic and mod it might work ok but...if any plastic gets melted .. you will know it!] because ...[caustic plastic smoke].. hits your throat and head like ice picks! :surprised .. no fun!


Easy ..Top load ..convection E mesh ... evolved from a ...

Great.... [origional] ... conduction... .. direct E mesh discovery!] :thumb_up: congrats to the inventer of direct E MESH!:thumb_up:

using top load convection E mesh..its very convienent.

but its easy to over load a dose of molecule!.. and 40 or 50 mgs in the bowl might be a bit too

strong for most..! :shock: ... it pays to WEIGH!! the product first!!!

let us know how your idea works!:thumb_up:


PS... the product vapes faster if it is reasonably close to the heating coil without touching it..

my method uses ..copper tubing... a...[ metal that holds on to heat very eficiantly]..

.My method worked well with the product less than 1/4 inch above the heating mesh...the distance of product ..[from heat source].. is something you need to test with different wattage settings.. good luck..

[[the farther the product is from heat source..the higher the wattage may need to be set...
 

Attachments

  • DSC00459.JPG
    DSC00459.JPG
    2.6 MB · Views: 1
Woolmer said:
I am afraid that the silicone/plastic apparatus below the conduction mesh of the wotofo atomizer will melt or burn. Though I suppose the material is not prone to melting since it is used in the vape in the first place.
I see now that this platform beneath the mesh is actually made of ceramic, so there is no worry of it melting.

I will hopefully try this out tomorrow and report back.
 
The noodle did not work.

First off I could not find a method to properly seal the noodle with the mod, so it is difficult to pull air through.

Second I am using a small mod; vaporesso luxe nano. I do not want to push the power to the max to be able to draw hot air down. Perhaps a bigger mod would help but still, it seems to take a lot of power.

Finally, though the setup I had allowed for easy loading, the convection mesh was too far from the heat source. Placing it inside of the mod would be ideal, but this is very impractical to load.

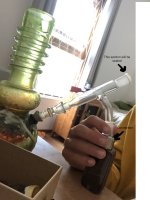
Instead, I am going to try a setup with a bong, in which the mod can be kept upright and the hot air will not struggle to reach the convection mesh.
 

Attachments

  • IMG_4681.jpg
    IMG_4681.jpg
    263.2 KB · Views: 3
Woolmer said:
The noodle did not work.

First off I could not find a method to properly seal the noodle with the mod, so it is difficult to pull air through.

Second I am using a small mod; vaporesso luxe nano. I do not want to push the power to the max to be able to draw hot air down. Perhaps a bigger mod would help but still, it seems to take a lot of power.

Finally, though the setup I had allowed for easy loading, the convection mesh was too far from the heat source. Placing it inside of the mod would be ideal, but this is very impractical to load.

Instead, I am going to try a setup with a bong, in which the mod can be kept upright and the hot air will not struggle to reach the convection mesh.


Hi..Woolmer...It shouldent be hard to acheive .. Iv e seen several videos where the Mod was turned upside down using a combination of expensive glass ware...and going through a bong .. it vaporized quite well..[not everyone wants to spend that much for a vaping device ]

My method.. [is much more portable compact and lighter]..uses very cheap material easily found at hardware store and works well..

For me the..FB..molecule..should sit less than a quarter inch above the heating mesh source.
[using copper tubbing].also you adjust the outside air flow using ..[air holes in mod cap]...for the right amount of air flow ...but taping off or adjusting off..some of the air holes..


The old butane lighter ..[conduction flame method].. of Applying flame upside down.. to a bowl always works quite well when vaping...but you can get the taste of the butane [and who knows what else from combusted fuel?].. in the vapor..something i dont like...

the more expensive desk top convection vaporizers..are bulky...and take a full 3 or more minutes just to heat up...and usually dont deliver as much [thick] convection vapor as using the high speed E mesh convection conversion...

So its just a matter of applying the heating mesh heat to the bowl [without loosing too much heat] At the ...[bowl/mod ..connection].... must be as air tight as possible... because if not... you will be getting extra outside cooler air entering the bowl.. lowering the air temperature coming from the mod heating element..

Just figure out how to make the.. [bowl/mod ..heating connection] ... [as air tight as possible] and it should work.. any outside air you need will come from the mods air vent holes in the cap...

remember.. you can turn the wattage up or down...

good luck
 
I think i have said this before...but is worth repeating... the air flow is very critical with .. E mesh convection.....

So if you are only getting a partial hit.. and not using ..3/4 or more ..of vaping material in one shot...
...and wattage is high enough...50 watts or a little higher...

it could be the air flow is set to rich or too lean!

I usually tape off part of the air flow holes on mod cap...[on outside of cap]...and adjust to a smaller amount of air flow...and do this till you find sweet spot and its exploding with ..rich clean convection vapor in one.... 2 to 3 second pull..

when you get the... air/heat mixture right..be sitting down...when you take a hit...!

if...you can get the A/H mixture ..[adjusted near perfect]..this can result in sudden explosion of nearly all the material in a super thick ..convection fog vapor.. thats almost too much to inhale in one shot... .... this has happened to me once..but i was using a screen cap on top of the material with rue seed! the cap was intended to prevent the seeds from being sucked into my mouth...

the screen cap must have had the effect of slowing down the hot air keeping it on the product longer....

taking a slow draw..[the more you reduce the outside air flow..[the longer the hot air stays in the material] this may be the way to make the vapor suddenly explode into super dense convection vapor..it takes some experamenting with the A/H...mixture with the right amount of vaping material...

THE normal c vapor is quite good,,,

But if you get the explosive type vapor .. ... you will be caught off guard ..because it will be extreemly thick convection vapor!.. you wont be able to take it all in in one inhalation...

...enjoy.. watch video below full screen..


Dennis Hopper..Peter Fonda in ...the trip..1967

 
Want to say that in ...[post 14 and 15 above]... it shows the best way to build the convection vaping chamber...

Ive found this way is most dependable for E mesh convection vaping..compaired to using a wad of stainless scrubber....[i think the scrubber might absorb too much of the hot air away from the product]?

It consists of using a thicker normal pipe screen .as a.... [base screen]....and forming....
..its shape.. in the copper tubbing...
[[normal pipe screen .[when bent]. holds it shape pretty good..]]

then get some fine SS 316 stainless mesh... and fold it into..[ two layers.]...bending the tips of the corners
over..and laying the ....[finer screen].. into the moulded ... corser pipe screen retainer..

[you can also fold the fine mesh into 3 or 4 layers if you want.. to prevent .[more product].. from falling through onto the heating mesh...after a quick tap on the fire button... it melts product into screen layers... embedding and locking into the fine screen layers....and stays put...untill you decide to vape...

if product is pre melted into the fine mesh...once you hit the fire button 3..4...seconds.. then take a pull..the upward hot air flow instantly pulls the vapor up the stem to the mouth peice fairly quickly..preventing any product from falling down on the heating mesh..and maintaining fairly pure high speed convection vapor ..:thumb_up:


post 14 above.... has pictures and explaines how to do it all...

always keep the product less than 1/4 inch above the heating mesh ..without touching any of the mesh!

then set to 50 or more watts...press fire button /count to 3 or 4..then slowly take a hit ..pulling the [heated air vapor]... upwards..its that simple!....:thumb_up: i run mine through a bubbler to insure its cool...
when taking a draw..[ without a bubbler]...carefully draw slowly.. noticing how warm or hot the vapor is....!

[you should notice a ... cleaner ..taste.. .lightness..with still great effect..compaired to conductions... more...heavy.. acidic and sometimes burnt. taste...because ..the temperature control modes... of most cheaper mods are often inacurate... causing burning ..and sometimes under heating the product..

Astrix - Sahara ( Video )
 
I managed to fine-tune this method. I also realized as you mentioned before Starway that it is necessary to have extra mesh layers to prevent any dmt from dripping directly onto the bottom heater mesh. This was previously causing me to burn a lot of dmt.

I cut 3 or 4 circles of mesh the circumference of the atomizer and fit them near the top of the atomizer. I also made a small indent/basket in the center of them for the dmt to pool.

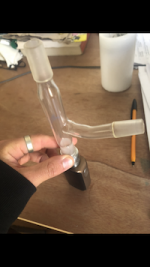
A three-way glass adapter is placed over the top of the atomizer to allow some space for cooling to occur. I am also using that same stock wotofo profile mesh that you mentioned as a heater.

The air holes are all kept closed, and the atomizer is fired at 25-30w without any inhalation for about 10-20 seconds. The side end of the glass adapter is kept closed with my finger. I can see looking down the glass adapter the vapour is pooling and once it is very thick only then do I inhale. I open the side end of the glass adapter while inhaling to allow for some more cooling.
 

Attachments

  • IMG_4284.PNG
    IMG_4284.PNG
    110.8 KB · Views: 3
  • IMG_4281.PNG
    IMG_4281.PNG
    115.8 KB · Views: 3
Back
Top Bottom