• Members of the previous forum can retrieve their temporary password here, (login and check your PM).

Grow log updates (Sclerotia) / "Best" Spore syringe storage

Migrated topic.
Oh btw, I tried the koolaid tea method. That works better than the regular tea method. Definitely covers the taste better. So there was a success there.

Bad news though, tried this weekend to do 14g. Made two cups, thus about 7g each. Drank first cup, waited a bit for any negative effects (or overwhelming positive ones, trying to not shoot myself to the moon again). Started drinking the second one when I got the red light: engines full stop, prepare the life boats! Sweating and nausea, almost heaved. Kept it down though, but stopped there. Wanted to keep it all down! Drank the rest a while later after my body returned from emergency mode. Regardless, no great results. :-(

Whatever is wrong with these things, I can't make it past a certain point with the ingestion. It makes me horribly sick. The best I can achieve is a light feeling, which is OK in itself, but can't get me any further than that. Would be good to make a whole bottle of this and just sip it all day to keep a light dose running while I do my outdoors thing. :)
 
Hmm, that is strange. Perhaps you (your stomach) are more sensitive to sclerotia than others...? Do you get nausea from regular cubes? I have never made a tea or tried the koolaid method. I always eat the dry product as is. Chew it up really well. Grimace. Swallow. :shock: 8)

But as far as I can tell, my other jars are fine. The jar that got contaminated was the one with the most growth too, so that is a bit disappointing... Looks like I may go ahead and start those golden teachers, just in case.
 
Hmm, I forgot about something. I've actually tried cubes a few times, at least I think they were cubes. Bought a whole bag of them from an acquaintance, so who knows what kind they actually were. I remember orange caps with bluish stems. No nausea that I can remember, trips were very LSD-like in intensity, although more natural feeling. That's what I'm hoping to recreate here.

That's the way I ate the cubes, straight up munching them, which is why it was the first way I tried eating the stones. Some people say cubes taste nasty, but they really weren't. Didn't have much taste at all actually. Stones have much more taste to them, or at least mine do.
 
Cubes are definitely funky but not unmanageable! Not something I would munch on just for the flavor!

:lol:

Since truffles have less water content then regular cubes, maybe the extra mass allows for a more pungent/concentrated flavor...? I'm sure this has been studied somewhere before I just haven't taken the time to look it up. I've heard some people describe the taste and texture of truffles as "nutty" ... I guess I will find out when mine are all grown up and ready for harvest!

:)
 
Alright, so my remaining 7 jars are still doing fine, however they don't seem to want to fully colonize, all except one. I don't think this is a problem (and it has only been 2.5ish months so they may get there) because it is still trying to colonize and sclerotia is starting to form in a few jars. Most of the jars really, some more so than others. The one that is getting really close to full colonization has strange bright white fuzzy looking, uh, balls on the top. :d At first I thought it was a contam but upon further investigation it may well be fuzzy myc growing on the top. I'll attach a pic when my camera stops being silly...probably in a couple days as I may need to take it into the shop...stupid refurbished camera. :lol:

Anyway, that isn't why I started this post. I read over at the shroomery that adding gypsum to your rye grain can help keep the grain from clumping, therefore allowing your spores and myc growth to spread easier than it would without it (unless I misunderstood something). I take everything I read from over there with a grain of salt but the post I read was from RR and I feel like he is legit. I mean, he inspired me to grow in the first place and I am not even a member over there...

So EternalPeace (or anyone who wants to chime in :) ), have you ever worked with or heard of adding gypsum to your rye grain? I am about to start another round of sclerotia to keep this cycle going and I haven't PC'd them yet. Waiting for the rye to germinate a bit so it will vulnerable to heat when I do PC. It may be too late to add gypsum but I was curious if anyone knew anything about it...

Thanks!
 
Small amounts of gypsum in the substrate seem to have good effects on the growth of mushrooms.

After some month of innoculation go for fruitbodies to make sporeprints. Most sclerotia cultures only live (gene banks/collections) as liquid mycel and the mushroom community will be happy if they recieve some decent prints.

Much love, tseuq
 
tseuq said:
Small amounts of gypsum in the substrate seems to have good effects on the growth of mushrooms.

After some month of innoculation go for fruitbodies to make sporeprints. Most sclerotia cultures only live (gene banks/collections) as liquid mycel and the mushroom community will be happy if they recieve some decent prints.

Much love, tseuq

Thanks tseuq! I have never made spore prints before but it is something I have on my list of things I need to learn! All in good time! :d
 
Sorry, didn't see your post until now. :-(

I use a bit of gypsum when pouring the grains into the jars before sterilization. I don't add it during boiling like some people recommend.

My procedure:

1. Wash grains until nothing comes off anymore (takes about 4-5 thorough rinses). I like to use a huge pot. Pour in the grains, and fill with water, leaving room at the top for the water to slosh around without the grains going overboard. Use both hands and go to town, shifting and rubbing the grains in the water to wash off the crud. Pour through strainer, then back into the pot to repeat. Keep going until you are sick of it. :) It helps prevent clumping, so don't cut this step short.

2. Create a 50% coffee water solution. Use a pot that can contain twice as much volume as your grains, and measure that quantity of water. Calculate half of that quantity, then measure out 14g of coffee per cup of the halved quantity of water. (To make an accurately weak coffee.) Get the water boiling, then add the coffee. Let boil for four minutes. Turn off heat. Strain out coffee grinds.

3. Add the rye berries to the coffee water, stir a bit, then cover. Let sit overnight, or about 8-10 hours. No longer than 24. We are doing two things here: (1) enfusing with coffee water, and (2) forcing the bacterial endospores to germinate, which allows them to be more effectively killed during sterilization. (If not germinated, some may survive the sterilization apparently.)

4. Check the grains at this point. If you see a small percentage of broken hulls (like 10-20%) then they are ready without further preparation. Otherwise, we need to make that happen: Boil the coffee/grain water for 15-45 minutes until the shells soften and begin to break open. Do not continue until they are mush! Check every 5-10 minutes until you see then STARTING to all break open. I stop when I'm seeing 10% of them breaking open, just enough to be noticeable. We want them to be firm, not sticky, yet soft and somewhat broken. I have found the timing on this step to be highly variable. Sometimes it's quick, and sometimes it takes forever.

5. Strain out the coffee water, rinse the grains with hot water to remove any coffee slime/starch that might cause stickiness, and let dry*. (*Just surface dry. We want these suckers loaded with coffee water, but dry on the outside to avoid stickiness.) Stirring the steaming grains in front of a fan works pretty good. (Using hot water in the rinsing step helps keep them hot and steamy, which helps remove the outside moisture quickly without losing much on the inside. Definitely do not rinse with cold water.)

6. Stir in a light sprinkling of gypsum to help keep the grains loose. I used to measure this, but started just eyeing it up. Use a tablespoon filled with it, and sprinkle around on the top until it looks lightly covered. Stir in until you can't really see it anymore.

7. Load into mason jars, about 3/4 full or a little more. (In my first round, I found that the ones loaded very high, like 90%, did not fare as well as the ones with more breathing room.) Cover with lids, four 1/8" drill holes in them, covered by synthetic filter disks. Screw on lids tightly. (Not superman tight, just not loose.) Cover lids with tin foil loosely. (Just meant to prevent water from lid of PC from dripping down onto lids.)

8. Load mason jars into PC. Fill PC with about 3 inches of water. Add a small pour of vinegar. (Just learned the vinegar trick--will stop the white crap from cementing itself on the outsides of your jars! I didn't really measure it, sorry.)

9. Sterilize those suckers! 2 hours at 15psi.

10. Take a thorough shower (I recommend exfoliating mitts and bodywash, scrub yourself from top to bottom) and get dressed in clean clothes. Or do it naked. Ha!

11. After PCing is done, keep PC sealed and let it cool down for another two hours or so. Use this time to thoroughly clean the hell out of your work area. (Turn off all airflow. Move everything off of the counter. Do first pass with bleach/water and clean rag. Let dry. Do second pass with 70% isopropyl and another clean rag. Clean all flat surfaces, walls, switches, absolutely everything in the immediate area. Bring out SAB. Repeat process with SAB, cleaning it inside and out, every single surface. Let dry.

12. Bring out your mycelium source (petri dish, master grain jar, syringe, or spore print). Sterilize it with isopropyl alcohol and put into SAB. Bring out any other instruments that are necessary. (Scalpel, inoculation loop, butane torch.) Sterilize them also and put them into the SAB. It is kind of like a safe area waiting room. :)

13. Check PC. If it is cool enough to easily touch with your bare hands, it should be ready. Don't do this when the grains are too hot, you don't want to kill your mycelium by mistake. Bring out your jars and load as many as you can directly into your SAB, leaving room to work. Put extra jars outside next to SAB in clean area, keeping their tin foil hats on.

14. If the jars are still too hot, wait a bit. If they are ready, begin working on the ones inside. Crack open one lid at a time, dropping in whatever source (sterilizing the transfer tool each time), and resealing the lid. Try to do this as quickly as possible, but not rushing yourself. Do it like you are defusing a bomb. Slow and steady, trying to avoid moving the air around, but as quickly as possible at the same time. There is no stopping at this point, it must be completed in one shot, or you will have to sterlize everything all over again.

15. When the jars inside the SAB are done: (1) sterilize a new set of outside jars for bringing into the SAB, then (2) move out the inoculated jars and bring in the new sterilized jars, as quickly and steadily as possible. Repeat until jars are inoculated.

16. Admire your work, and hope everything went well! Go little shroomies, grow! :)
 
The Grateful One said:
Alright, so my remaining 7 jars are still doing fine, however they don't seem to want to fully colonize, all except one.
Do the jars look dry? We want to see condensation droplets hanging on the inside of the jars. Not a lot, but just enough to indicate that there is humidity in there. If you don't see that, I think they are too dry. Emergency procedure might be required.

What is the average temperature of the area?

I had this problem with my first batch. Very dry, took forever to colonize. They eventually did, but I could still see the grains clearly all the way to the end. (In stark contrast to my second batch, where after a week there was nothing visible except thick white stuff. It took over the jars like the blob.) Noticed a definite burst of activity when the weather got hot, so they obviously like it around 75-80 degrees better than 65-70. That was the second round of activity, like a second wind, that I noticed my first batch going through.
 
Thank you for the detailed write up! I will definitely be referencing that next time!

As for the jars I have now, some do appear to be a bit dry. Perhaps, I drained them too well before PCing...? I keep my house at 75 degrees but with it being fall now, temps outside have been lower than 75. These fluctuations along with not enough moisture are likely slowing the growth down. I am putting a little heater in the closet to keep the temperature stable (which is what I used to do when growing GTs). It shuts off when the ambient air reaches a certain designated temp. Hopefully that will help them "pick up the pace."

Besides that, I'll be completing my next set of jars soon and will report back after they have been inoculated.

:)
 
I hope the heater helps!

I am also thinking about starting a new round. Since my ATL7s are about 3/4 though at this point, it's probably time to get a new batch ready. I had isolated three cultures on agar at the same time, which are sitting in my fridge, ready to go. (Actually four, but the goliaths failed spectacularly. Apparently there was a contamination in the syringe. Now I now that can actually happen.)

I check them every now and then to see if they are OK, and they are just fine. No contams showing at all, no further growth evident. They appear to be in perfect stasis. So if you are planning on storing your agar cultures for a short duration (half a year or so), simply putting them in the fridge seems to work just fine. (Sealed properly, of course.) No need for master cultures, although that would be preferable when you find a culture that works really well.

Mex A, which was my first try, except I had used a syringe. This time it would be from agar, so a nice comparison experiment.

Mex ATL7, which is currently in progress. Petri dish with missing square in the center, from when I inoculated the master grain jar. Plenty more agar/culture to work with in there.

Penis Envy, in case I decided to try a quickie fruiting experiment. I figured that if I was going to go cube, this would be the best way to do it.
 
Boy, time does fly sometimes! On the 12th my babies will be 3 months old. The heater really helped the jars speed up their colonization process. Most are getting closer to being fully colonized now. I guess I was accidentally letting it get too cold in my closet before putting the heater in there and it was causing the myc to move at a snails pace... keeping my house temp at 75 was not enough, I should have put the heater in there from the get go but oh well. :d

I think one may have some fuzzy looking white-ish mold (don't have a pic at the moment)...I had a spare jar that had grain in it that I did not PC or inoculate and left it sit and forgot about it and it ended up growing a very similar looking "mold" ... Poofy sort of white/off white balls that I thought might be myc in an earlier post but am now having second thoughts... It is a fully colonized jar too, of course! :p

The other 6 are still completely fine. I'll have to be more careful/sterile when I get my next set going (been busy and haven't got around to it yet. Hopefully tomorrow I'll get the next set going as I am off work). Now that I think about it, I think I forgot to shut off my AC when inoculating last time. That would be one possible answer to how/why my jars got contams in the first place.

EternalPeace said:
I'm going to crack one of mine open a little prematurely, picking the most developed one to test.

Right on! I hope they are nice and potent! I'd love to hear the results of your bioassay!
 
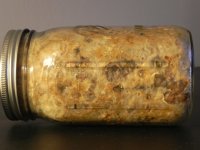
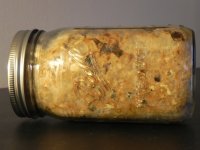
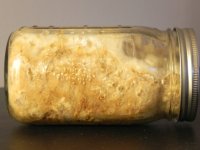
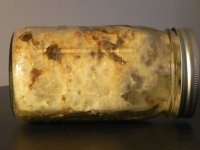
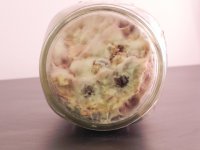
Here's the jar I'll be cracking open. Seemed to have the most growth, but there were a few others that just about matched it.

Pictures in order:
1. Bottom
2. Right side
3. Left side
4. Top

The right side showed little growth for some reason. I'm not quite sure why that was. I think this one was a middle jar, so it wasn't like there was a temperature difference due to it being up against a drawer side.

Also somewhat oddly, there seems to be growth on the top, kind of to the left side. I didn't figure anything would grow up there, since there were no grains up there. The mycelium grew up the sides to the top, crawling over the glass without substrate, seeming to reach for the water droplets up there, and this resulted. I'll see more when I get inside.
 

Attachments

  • SideBottom.jpg
    SideBottom.jpg
    105.2 KB · Views: 0
  • SideLeft.jpg
    SideLeft.jpg
    96.7 KB · Views: 0
  • SideRight.jpg
    SideRight.jpg
    89.5 KB · Views: 0
  • SideTop.jpg
    SideTop.jpg
    90.7 KB · Views: 0
Wow, that looks great! I've been contemplating how to get the myc out of jar. When birthing my GT cakes, it was simple because the myc squeezed the substrate, making it smaller. They just fell out basically.

Do you have a particular method for getting out the goodies without breaking jars? I can't recall if I already asked this earlier in this thread or if I was just reading about it somewhere, so forgive me! :d
 
First picture:
A look inside the jar before I started scooping it out into a sieve set over a bucket.

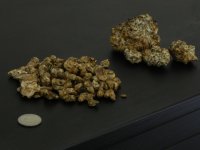
Second picture:
Results of the harvest. Pile of small pieces on the left, with a quarter set next to it, and four larger chunks next to it that I'm not sure what to do with.

The yield seemed low. Maybe this is more normal for ATL7--supposedly less truffle growth than Mex A, but easier to fruit. Or maybe it was premature.

Also, the stones seemed, well, not as stone-ey as Mex A. They were softer. I had to stop myself shortly after starting because I realized I was breaking up stones by mistake. This slowed down the procedure greatly. I would have a chunk of white stuff that was slightly harder than the grain-mixed stuff, but was easily breakable, so I would keep breaking it. Then I realized that there weren't any more grains and it was all white in there, thus it was probably a stone formation. Honestly, it felt like a mushroom fruit buried in whitish grainy crap. It's just hard to know when you're through the grains to be at one, because they are pretty small.

Most of what I found in there was small, but these were definitely stones. I also found four much larger chunks that you see to the right in the picture.

These larger chunks were harder than the other whitish grainy stuff, indicating that they were something of value, yet they were soft and breakable, with pieces of grain buried in them. Are these large truffles, which would be awesome, or just very solid colonized substrate? Is there any psychoactive value to them, other than the stones that might be buried inside? I decided it wouldn't hurt to dry them with the rest, so I cleaned them the best I could without damaging them any further, and put them on the side.

Weight results:
46 grams of wet small stones
48 grams of wet large stones/unknown material
94 grams total
 

Attachments

  • InsideUntouched.jpg
    InsideUntouched.jpg
    82.8 KB · Views: 0
  • HarvestResults.jpg
    HarvestResults.jpg
    88.2 KB · Views: 0
To get the substrate out of the jars, I simply use a spoon. At least, that's how it had to be done this time. With the Mex A, I could bang the sides with my fist and chunks would fall out. What didn't fall out could be pried out with a spoon. This time the substrate was colonized so solidly that it was a big white block in there, and I had to brute force it with the spoon the whole way through.
 
94 grams are better than no grams! :lol:

Thank you for posting your pics, it will definitely help me out whenever harvest time comes. Also, I have thoroughly enjoyed the back and forth we've had going, so thank you for that too! That yield may be low, I'm not sure, as I am no expert. But with your stones being softer this time around, perhaps they will be easier to chew up and swallow...if you decided to go that route. I remember you mentioning making tea out of them, which I have never tried but plan to someday. Regardless, I applaud your efforts!

I'll be sure to spoon out my goodies, too...just wasn't sure if there were any fancy methods of getting truffles out of jars...:p

:)

I got around to washing and soaking my next batch of rye seed today! So my next set of jars should be going within a a couple/few days...no more than a week if all goes well!
 
I am considering only the 46g to be certain, and the 48g to be unknown, so that makes it about half of what the Mex-A was. But you are right, any grams is better than no grams--especially if they actually work.

You're welcome, no problem. That's part of why I'm doing it. Kind of like comparing notes. :d

Thanks for reminding me. I need to create a master grain jar for my next batch. I'll try to get to that next weekend.

I think I'm going to give my ATL7 a test run tomorrow. Dried it last night and today, blended to powder and put into the freezer. I am going to either cap it or tea it, either way should work. I think I'll try capping first. Bioassay time! Here's to no heaving!

Regarding fancy methods of harvesting truffles: I read something about using water to get the grains off the truffles. Maybe next time I'll give that a shot. Have to do more research.
 
How do you intend to inoculate your new batch? Do you perform an agar isolation?

A secondary method of high speed colonization is to use a liquid inoculant (LI), but that process has been found to be less perfect than agar. Just another possibility for you to consider in case agar can't be an option.
 
Back
Top Bottom